
Photoshop by Adobe is well known as a picture and graphics program. Graphic artists have used it for years as the preferred program for creating digital art and enhancing photographs. It is so much accepted in today's world that any altered or suspicious photograph is often referred to as being "Photoshopped" or "Photochopped".
Photoshop is also a fantastic tool for designing knives. It can be expensive and it does have a steep learning curve but once you get the hang of it, the possibilities are limited only to your imagination. Photoshop can be used to design a knife and render very realistic drawing to share with your customer for approval or to serve as a template for making the knife.
It also allows you to do "what if" changes to the design and try different things. A lot of people use CAD software for knife design. There are similarities and differences between Photoshop and CAD software. CAD often allows you to do three dimensional drawing which cannot be done with Photoshop. Photoshop allows you photo realistic renderings of your drawing which most CAD software does not. Both allow working "layers" which is a VERY powerful tool when you learn to work with it.
Both types of software tend to be expensive and have a steep learning curve. The full-blown versions of Photoshop can cost as much as $600 retail. High-end CAD programs such as Turbo Cad can be as expensive. However, there are much cheaper streamlined versions of Photoshop that can be had for around $100 or less. Visit the Adobe website to see all of the versions available. The cheaper versions will do everything you need to design knives. I happen to have Photoshop 7.0 so that is what I know and what I will use for this tutorial. Most of the examples I show will apply to all versions of Photoshop.
Warning: This will be an extensive tutorial and at times will be confusing or maybe even overwhelming. There is a lot to cover with Photoshop. It is an extremely powerful design tool but it can be complicated. If you stay with me and learn the basics of Photoshop I think you find it to be an invaluable tool for a lot of applications. You will probably need to go through this tutorial a few times and practice with Photoshop to get the hang of it but it will eventually sink in and become second nature the more you use it.
If you have some experience with Photoshop this will how to design a knife with the program. If you have Photoshop but never really used it, this will give you a good start in learning some of the basic tools. If you have never used Photoshop the technical parts will probably be pretty confusing to you but it will still show you what can be done with the program.
Just to be sure we are on the same page with computer terminology, I will list a few terms that I will use throughout this tutorial.
Click or Left click = clicking with the left mouse button.
Right click = clicking with the right mouse button.
Double click = quickly clicking on something twice with the left mouse button.
Click and hold = click on something with the left mouse button and keep holding the button down.
So lets get started. If you have Photoshop, I highly recommend that you open it and follow this tutorial by performing each step as you go along by switching back and forth between this web page and Photoshop.
First, I want to spend a few moments talking about resolution in digital images. This is important if you are making full sized drawings. We often hear digital photos described in terms of "size" such as 1 MP (MegaPixel) or 5 MP. Sometimes they are described in terms of "size" in pixels such as 800 x 600 or , or 2592 x 1944. What does that mean?
Digital images (photos) are correctly described in terms of pixels which, in turn, determines the size of the image file in total pixels. The image has NO physical "size" until it is displayed or printed. I'll explain that in a moment.
Let's say your image is 1280 x 960. That means your image is 1280 pixels wide x 960 pixels high. If you multiply 1280 x 960, you get the total number of pixels, 1,228,800 pixels. In general data terms, 1 million pixels equals 1 megapixel (rounded off). So in this case we have 1.2 million pixels which would generally be rounded off to 1 MegaPixels (MP).
Each of those 1.2 million pixels contain bits of data that define the color of that pixel. In most cases, each pixel will contain 24 bits of data that define the exact combination of the three primary colors, red, green and blue, that in combination determine the exact shade of color for that pixel. With 24 bit pixels, literally millions of colors are possible. If we multiply the 1.2 million pixels by 24 (bits of data per pixel) we get 29,491,200 bits of data. That's right, over 29 million bits of data just to create that single 1 MP image.
In terms of
data,
8 bits = 1 byte.
1024 bytes = 1 kilobyte (KB).
1024 kilobytes = 1 megabyte (MB)
So, in the example above, our 1 MP image (in terms of the number of pixels) actually contains 3.52 megabytes (MB) of data. This is why a 1 MP image may take up more than 1 MB of space on your computers hard drive or the flash card in your camera. At this point it is also important to note that this is "RAW" data, meaning that is is uncompressed. Most cameras and images today are compressed using a data compression technique such as JPEG which can greatly reduce the the size of the data and the space required to store the image.
Modern cameras commonly have the capability of taking images of up to 8 or 10 MP. An 8 MP image would be something like 3264 x 2448 pixels (7,990,272 actual pixels). That equals an astounding almost 200 million bits of RAW data, or over 22 MB of raw data, for that one single image! With jpeg compression it will be reduced in data size but it's still going to be a HUGE data file.
Stay with me here, this will be important to understand later on. We will get to the actual tutorial on how to design a knife in Photoshop. You can skip ahead if you want to but I think it is important to understand the underlying principals of digital images. If you want to create precise full sized images to use as templates for your work, this understanding is critical.
The main point I am trying to make here is that your image, say 1280 x 960, has no physical size until it is displayed or printed. Here's why. The quality and the detail of the image that you see, either on your computer screen or in print, depends entirely on how many pixels are displayed (or printed) per inch. The more pixels per inch, the higher the resolution, the higher the quality and the more detail in the image.
Another common point of confusion with digital images is the difference between how it is displayed on your computer screen and a printed image. Computer screens typically display images at a resolution of between 72 and 96 pixels per inch (ppi). Computer monitors come in various sizes and are capable of displaying at different resolutions. For the sake of discussion lets say you have a computer monitor that is 16 inches wide by 10 inches high. And, lets say your computer monitors display resolution is set to 1280 x 720 pixels. If you divide 1280 (width in pixels) by 16 (width in inches), you get 80 pixels per inch.
So, if you display the 1 MP image described above, which is 1280 pixels wide, at 80 pixels per inch, it would be 16 inches wide and fill your computer screen from side to side. This is why most images on the Internet are relatively low resolution of 800 x 600 or 1024 x 768. At 72-92 ppi, these will fill most computer screens and look good. Higher resolution photos would be bigger than could be displayed without having to scroll around in order to see the whole image and they would be very slow to download because of the huge amount of data they contain.
Prints are a different story. Printers typically print at a resolution of 200-300 pixels per inch (printers usually state this as dots per inch or dpi but it's the same thing). 200-300 dpi is generally the minimum resolution to be considered photo quality. Why is this important? Let's take our example of a 1 MP (1280 x 960 pixel) image. When displayed on your computer screen at 80 ppi it was 16 inches wide. However, when printed at 200 dpi, it is now only 6.4 inches wide. You can blow it up to a larger size but you will sacrifice quality because there are a set number of pixels in that image. You cannot add pixels so all you can do is reduce the resolution and quality by printing fewer pixels per inch.
To print a full page 8.5" x 11" image at photo quality resolution of 200 dpi, you will need an image 1700 pixels x 2200 pixels, or approximately 3.7 MP.
Confused? Probably. It is hard to get your mind around this. I hope it will become clear as we go along in this tutorial.
OK, now lets get to the Photoshop tutorial and I will show you how all of this mumbo jumbo applies to designing a knife in Photoshop.
As I said earlier, I am using Photoshop 7.0. It is not the latest version of Photoshop but it does everything I need so it is what I use. The steps I will show you will apply to all versions of Photoshop although the exact menus and specific way to do things may vary.
The first thing we need to do is create a new "canvas" on which to draw our knife. When we do this, Photoshop will ask you what size and resolution you want the canvas to be. Ahhh, there's the resolution thing! For this tutorial, let's design a bowie knife. Let's say this knife will have a 10 inch blade and be about 15 inches in overall length. So, we need a canvas at least 15" wide. Let's give ourselves a little more room to work and make it 20 inches wide by 12 inches high. It's more room than we need but we can trim it down later.
Now, we want to make a full sized drawing. Why? Because we can print out our drawing so we can see a real, full size, three dimensional representation of the knife. We can hold it in our hand and see what it is really going to look like and how it fits the hand. We can also us the full size print as a template to trace onto our materials and cut out our parts.
So what resolution do we need? My printer prints at 200 dots per inch (dpi) which is the same thing as 200 pixels per inch. So it makes sense to create our 20" x 12" canvas at 200 pixels per inch. One inch on the screen will equal one inch on the paper. If we design our guard exactly 3/8" wide it will print out on paper exactly 3/8" wide and we can use that to print as a guide to cut our material.
So let's get to it.
Start Photoshop. You should see a screen something like this. The exact "tool boxes" that you see on the screen depends on your settings. What you see here are the tools I typically use. These boxes and bars can be positioned and sized as you like them n the screen by dragging them around with your pointer There are several other tool boxes that can be opened but these are all that we will need in our tutorial. The bar across the top is the "options" bar. The vertical bar on the left is the "tools" box and it contains the drawing tools we will use. I have 2 boxes opened on the right. These are (top to bottom) the "navigator" box and the "layers" box. There is also a "status" bar across the bottom of the screen but it doesn't show anything at this point. I will explain more about these as we go along.
You choose which tool boxes you want from the "Window" menu at the top of the Photoshop screen. Here you can select the tool boxes that you want to show by click on them and they will show a check mark when they are chosen.

Now we need to create our blank canvas. Go to the "File" menu at the top left of the screen and choose "New".

This will open a "new" box where you choose what size and resolution your new canvas will be. Under the "Name" field you can enter a name for the image that you will create, let's call it "Bowie Knife". Next is the "Preset Sizes" field where you can choose from a variety of preset image sizes but in this case we want a custom size that is not listed. Look to the right of the "Width" and Height" fields and notice the the boxes where it says "pixels" is a drop-down box. By clicking on the down arrow symbol you can change from "pixels" to "inches. Do this for each of the boxes and change the Width to 20 and the height to 12. Set the "Resolution" to 200. "Mode" should be RGB and under "Contents" the White button should be selected.

Your box should now look like this (below). Notice that "Preset Sizes" box automatically changed to "Custom" when we entered our own specific sizes for the image.

When you have everything set, click the "OK" button.
Now you should see your new blank canvas.

Click the "View" menu at the op and make sure both "Extras" and "Rulers" are checked. Notice the rulers along the top and side of our canvas. Also notice that the blue bar at the top of our canvas shows the name of the image, "Bowie Knife" in this example, and the size at which our image is displayed. In the example here the image is shown at 16.7% of full size in order to fit the full width and height in the window.

We can enlarge or reduce the image as needed using the slider at the bottom of the "Navigator" box or the icons at either end of the slider.

Notice in the "Layers" box, a single layer is shown, the "Background" layer. Also notice that there are 3 "tabs" at the top of the "Layers" box, "Layers", "Channels" and "Paths". You can choose any of the tabs by clicking on them. It is important to be mindful of which one is chosen because we will be working with both layers and paths in our image. Likewise, notice that the "Navigator" box has tabs at the top labeled "Navigator" and "Info". We want the "Navigator" tab chosen.
Now let's take a minute to go over the tools in the box on the left. These are the primary tools that we will use to to draw, erase, and create our image.

If you hover your mouse pointer over any of the tools a description of the tools will appear. Below I have highlighted the "Pencil" tool and a little box opened showing me that it is the "Pencil Tool". Notice that there is a little black triangle in the lower right corner of most tools. This is a drop-down menu where you can change the tool by choosing different options.

For example, if I left click on the little triangle in the lower right corner of the "Pencil" tool, a drop-down menu opens where I can choose to change it to the "Brush Tool".

NOTE: I am not going to attempt to describe every function and tool in Photoshop. There is just too much to cover and even after using it for years there are functions that I am not experienced with. Instead, I will show you the few tools and functions that you will need to design a knife. If you want to learn the full capability of Photoshop there are a number of excellent books available online and at your local bookstores. There are also instructional DVDs and even classes available.
Another note about drawing in Photoshop: Most people use a mouse to operate their computer. That works fine in most cases. However, if you want more precise drawing or plan to use Photoshop a lot I highly recommend buying a graphics pad where you actually draw with a pressure sensitive stylus (pen). Graphics pads are fairly expensive but once you have used one you will never go back to drawing with a mouse. Wacom makes the most popular and best (in my opinion) graphic pads. Search for them online. There are other and cheaper brands but remember the saying "you get what you pay for". In my experience it is true when it comes to graphic pads.
OK. So we have a nice blank canvas to work on. Now we need to draw a knife. No we are not going to choose the "Pencil" tool and just start dragging our mouse around to draw a picture. This is going to be much more involved than that. You can do it the simpler way but I am going to show you the more involved precise method. You can choose to do it my way or not, but this is how I do it. With my experience I can do a complete drawing in about an hour.
One of the most powerful and useful features of a program like Photoshop is the ability to work in layers. This allows us to draw each part of the knife, the blade, handle, guard, pins and even the grinds on separate layers. The individual layers can be turned on or off, changed and manipulated individually, and even printed individually if you so desire. If I don't like the design of the guard I can change only the guard without having to redraw the whole knife. I can create several guards and turn them on and off to see what they look like on the knife and compare or allow a customer to choose which he likes best.
For this tutorial we will create a relatively simple Bowie knife. Our individual components will be the blade, guard, handle, handle pins (and holes) and the blade grind lines. That is 5 components so we will need 5 individual layers. We will also need 5 individual "Paths". I will explain about the "Paths" as we go along.
Look at the bottom of the "Layers" toolbox and notice that there are 6 small icons across the bottom of the toolbox. Like the other tools, if you hover you mouse pointer over the icons (without clicking the mouse buttons), it will show you a description of each icon. To save you the trouble they are from left to right: "Add a layer style", "Add a layer mask", "Create a new set", Create a new fill or adjustment layer", "Create a new layer" and "Delete layer".
We want to create 5 new layers so click on the "Create new layer" icon at the bottom of the "Layers" toolbox. Notice that in the toolbox window above a new layer has been created and named "Layer 1". Do this 4 more times until you have layers 1-5 in addition to the "Background" layer.

Notice that there are two little boxes to left of each layer, The left box has an eyeball icon and one of the right boxes has a paintbrush icon. The eyeball means the layer is visible. If you click on the eyeball you can turn it off so that layer does not show in your drawing. Clicking it again turns it back on. The paintbrush icon shows the active layer that you are currently working on. It is important to be mindful of which layer you are working on as we create our drawing. Only one layer can be active at a time and this is the layer you be be drawing on.
If you click on a layer with your left mouse button and keep holding the button down, you can drag the layers up or down to rearrange them. The layer at the top of the list will be the top layer in your drawing. Think of it like drawing the individual parts on pages of clear plastic. You can see through the top layers and see the layers underneath unless they are hidden by something drawn on an upper layer. For example, we are going to draw the knife blade on one layer the the grind lines on another layer. We need the grind line layer to be on top of the blade layer or else the grind line would be hidden underneath the blade.
When we created our new layers they were automatically named by Photoshop "Layer 1", "Layer 2" , etc. More complex drawing might have dozens of layers so it can get pretty complicated to keep track of what layer contains what part of the drawing. So let's rename our layers with a more meaningful name.
Right click on "Layer 1". This will open a menu as shown below. Choose "Layer Properties" by clicking it with the left mouse button.

Now you should see a new box with the "Name" field highlighted. Type in the new name for the layer. In this case we will rename "Layer 1" to " Blade".

Now you should see the layer "Blade" in your list of layers.

Repeat this process to rename the remaining layers "Grind", "Guard", "Handle", and "Pins". When you are finished your "Layers" box should look like this:

NOTE: With most things in Photoshop there are more than one way to do something. I am not going to attempt to show you all of the alternative ways to do every step. You will learn them if you work with the program much. I will show you one way to do each step in this tutorial. But, as an example, an alternative shortcut to rename layers is to double click directly on the layer name and you can type a new name directly into the layer.
Notice that I said to click directly on the layer name. If you double click in the layer box but to the right of the name you will get an entirely different result. It will open a "Layer Style" box where you can add shadows and textures to whatever is drawn on that layer. Photoshop is full of little shortcuts and optional ways to do things.
OK, we have our 5 layers and now we need to create 5 "Paths". Don't worry you will see why as we go along. In the "Layers" toolbox, left click the "Paths" tab. you will see a blank window below "Paths" as we have not yet created any paths. Don't worry, all of our layers are still there under the "Layers" tab.

So now we need to create 5 new "Paths". We do this much like we did with the layers. Left click the "Create new path" icon at the bottom of the toolbox. Do this 5 times until you have 5 "Paths" as shown below.

Just like we did with the layers, let's rename the paths "Blade", "Grind", "Guard", "Handle" and "Pins".

We now have our canvas and all of our layers and paths so we are ready to start designing a knife! Let's start with the blade. In the "Layers" toolbox click on the "Layers" tab and make sure the "Blade" layer is selected with the paintbrush icon showing next to it. If not, left click on the "Blade" layer to select it. This insures that what we draw will be drawn on the appropriate layer.

Now, in the "Layers" toolbox, left click the "Paths" tab and select the "Blade" path by left clicking that path to highlight it.

Let's turn on a grid to help us layout out design. From the "View" menu at the top of the screen choose "Show" and "Grid". Also in the same "View" menu, make sure "Snap" is checked.

Now we had a nice grid drawn on our canvas. When we draw, our lines and connecting points will "snap" to points on the grid. This will help us to draw straight lines and be precise in out measurements.

We are going to draw a full tang Bowie knife with a 10" blade. Allowing 1/4" for a guard and assuming a 4" handle, we should have an overall length of 14 1/4". The blade will be 2" high from top to bottom and we will draw in a 1 inch high grind. We will start by drawing the blade. Pay attention to the rulers at the top and side of you canvas to keep the correct dimensions of the knife.
From the tools of the left, choose the "Pen Tool".

If the "Pen Tool" is not showing, click hold the little triangle to open the menu and choose the "Pen Tool".

Now we can actually start drawing our blade. With the "Pen Tool" selected, start drawing by left clicking somewhere on the canvas. This will set your first anchor point. Move your mouse pointer to another location and left click again. This will create another anchor point with a line connecting it to the previous anchor point. Keep going and creating lines and points until you have something similar to the drawing below. Don't worry if it is not exactly like mine or if you make a point that you don't want as we can correct it later. Keep going until you get back to the starting point and then it will "close" the drawing as one continuous line.

Congratulations! You just created a "Path". If it doesn't look like the one above we can adjust it until it does by moving the connecting points around and I will show you how in a minute.
You might notice that I like to start my drawings 1" from the left and 1" down from the top. It's just easier for me to see where things start and end if I have a little room around it. You just need to remember to add that inch onto the other end to come out with the right overall length or height. For example my drawing above goes from 1" to 15 1/4" on the top ruler. By subtracting the 1" border on the left we come out with the correct overall length that we were shooting for of 14 1/4".
Do you need to move some of your connection points to get the correct shape? Here's how: You will need the "Direct Selection Tool". Like with the other tools, this tool has a drop-down menu opened by clicking the little triangle on the lower right. In this case your choices are "Path Selection Tool" and "Direct Selection Tool". The "Path Selection Tool" will select the entire path including all of your lines and connecting points. The "Direct Selection Tool" will select individual lines or connecting points so they can be moved independently of the other line and points. For now, we want the "Direct Selection Tool".


Using the "Direct Selection Tool" you can drag ant connection point to where you want it. It will remain connected to the other lines and connections points so they will follow the one you move. Don't worry about the curves yet, we will get to that in a few minutes. For now, just try to get something like I show above. The main thing we are looking for here is to get the handle portion squared, 4 1/4" in length (4" handle and allowing 1/4" for the guard) and squared shoulders for the guard to butt up against. I have the handle 1" high in this example and centered in relation to the blade.
Play around with it a little. If you need to add or delete a connection point look at the drop-down menu under the "Pen Tool" and you will find tools to add or delete anchor points.
OK, we have something that looks like this.
It doesn't look that much like a knife does it? For one thing, the tip of the blade is too high. Let's bring it down a bit using the "Direct Selection Tool" to move the anchor point at the tip of the blade down about 1".
Now you should have something like this.

This is supposed to be a Bowie knife so we can see there is too much slope along the top to the blade. We need to have a level spine that drops off to a clip point at the front. To do that, we need to add an anchor point along the spine so let's add one at about the 12" mark on the top ruler. Do this with the "Add Anchor Point Tool". Move your new anchor point up level with the top of the blade at the 1" line on the ruler on the left using the "Direct Selection Tool".

Now we need to put a little curve in the blade. We will do this with the "Convert Point Tool" found under the same tool box as the "Pen Tool".

Using the "Convert Point Tool", left click and hold on the anchor point at the tip of the blade. While still holding down the left mouse button, move the mouse and you will see equal curves develop on either side of the anchor point. Stretch it out a little like show below and release the mouse button. You will also see two new control points stretching out from either side of the anchor point.

Left click and hold on each of these new control points and move them as shown below.

Hey, look at that! A bowie Knife! You have just discovered one of the very powerful tools in Photoshop for designing knives. When working in "Paths" you can drag anchor points around, add them, delete them, make perfect curves of any radius you like, and so much more.
We are almost done with the blade design. We just need to make some holes for our handle pins. Again, there is a tool to do just that. Zoom in nice and close on the handle area of the knife blade using the slider in the "Navigator" tool box.
Notice how the rulers expand when you zoom in. At this 50% zoom level I can see there are grid lines at 1/16" intervals. If I zoom in more the grid will automatically readjust to even smaller grid line intervals. This is how you can make very precise measurements and drawings. Let's say we want to use 3/16" pins to attach the handle to this knife so we need to make some perfectly round, evenly spaced, 3/16" holes in the handle.

We want to use the "Elipse Tool" to draw our circles for the pin holes. You can select the "Ellipse Tool" from the tool box on the left. Notice that we you have that tool box highlighted (active) your choices also show up on the "Options" bar at the top of the screen. If you don't have the "Options" bar turned on you can do so from the "Window" menu at the top of the screen.

OK, we have chosen the "Ellipse Tool" to draw our circles. We want these to be prefect rounds circles 3/16" in diameter. Notice in the options bar that there is a star shaped icon on the right with an arrow nest to it for a drop-down menu. Click the arrow and you will see the "Ellipse Options" menu with choices for our "Ellipse Tool". In this case, we want to make sure "Circle" is selected.

Now, left click and hold somewhere in the handle area of our knife. While holding down the left mouse button, move your mouse and you will see the circle grow as you move the mouse. We have "Snap" turned on so the outer edge of the circle will "snap" to the nearest grid line. We want a 3/16" circle so we want it to cover 3 grid lines. Don't worry about the location, only the size, we can move it later.

We have one perfect 3/16" circle added to our drawing that represents a pin hole in the knife handle. Let's say we want 6 pin holes. You can repeat the process you just did to draw 5 more circles or you can copy the one you just made and paste it 5 times. Here's how.
Choose the "Path Selection Tool"

Click on the circle you just made. You should see it become active with four little squares around it.

Now, go up to the "Edit" menu at the top of the screen and choose "Copy". Notice that another choice in this menu is "Paste", we will use that next. Also notice "Crtl+c" next to the "Copy" function on the menu and "Crtl+v" next to "Paste". These are keyboard shortcuts and another way to do the same thing. Rather than opening the menu, once you have your circle selected with the "Path Selection Tool" you can simply hold down the "Ctrl" key and press the "c" key on your keyboard and it will copy your circle. Choosing "Paste from the "Edit" menu OR holding down the "Ctrl" key while pressing the "v" key will "paste" a copy of your circle right on top of the original one.
Using either copy and paste method, make 5 copies of your circle so we have a total of 6. They might be stacked up on top of each other but we will move them where we want them next.

Once you have your 6 identical 3/16" circles copied and pasted, you can drag them where you want them by using the "Path Selection Tool". Just left click and hold on a circle and then, while holding down the left mouse button, drag it where you want it on the handle. Use the grid to evenly space the holes. Bear in mind that the front 1/4" of the handle portion will be covered by a guard later so take that into consideration when spacing your pin holes.

For this tutorial we will say our blade shape is done! Now we want to draw our blade shape into the "Blade" LAYER. Remember earlier we made sure we had the "Blade" layer set as the active layer before we started working in "Paths". So anything we draw from "Paths" will be drawn into the "Blade" layer as I am about to show you.
Now we need to use a couple more tools to turn this shape (path) into a drawing on a layer. First we need to click the "Load path as a selection" tool found at the bottom of the "Paths" tool box. It is the third circular icon from the left.

When you click the "Load path as a selection" tool ,your "path" will become active and look like a bunch of moving hash marks.

Now, select "Stroke" from the "Edit" menu at the top of the screen.

This will open a new window as shown below. Here, we are defining how our path will be drawn onto out layer. We can define how thick we want the lines to be, what color the lines will be and whether the lines will be drawn along the inside, outside, or along the center of the path lines. For this example I have set the stroke width to "5 px" (5 pixels). You can make this any size you want by typing in a different number but 3-5 pixels works well for most knife drawings.
Notice the color is red. Let's change the color to black since we have a white background.
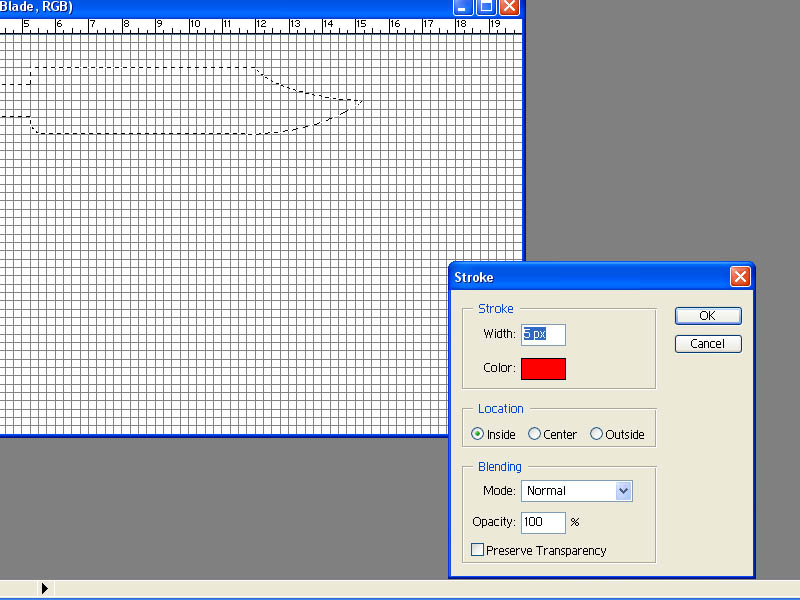
If you click on the red box next to "Color:" it opens the "Color Picker" window where you can choose virtually any color you want. There are 3 mains parts of this window that we need to be concerned with here. The large box shows a range of colros fading from red to white to black in the corners. Wherever you click within this larger box selects the new color we will use. The active color is shown in the smaller box to the right of the big box. The rainbow bar between the boxes allows you to choose the range of colors that is shown in the bigger selection box.
Play around with it to see how it works but end up with choosing black by clicking in the extreme lower left corner of the bigger selection box. You will see the smaller box change to black as the selected color. Click on the "OK" box.

Now we are back to the stroke window. You can see that the "Color:" is now black. We are set to "5 px" for our width and I have selected "Inside" under "Location" I like to draw my lines inside the path so that when I use my drawings as templates I can cut and/or trace around the outside of the printed lines to get my actual size. Click "OK".

Now, click "Deselect" from the "Select" menu at the top of the screen. This will "deselect" your path.

Finally, notice that the "Blade" path is highlighted in the "Paths" tool box.

We want to deselect this as the the active path. In fact, we don't want any of the paths to be active (highlighted) at this point. Click anywhere in the blank area below the paths and you see that none of the paths are highlighted.

We have just drawn our first layer, the blade. So let's see what we have done. Let's go back to our layers by clicking on the "Layers" tab at the top of the "Layers tool box.